On Sheet – A CTC Game
On Sheet – A CTC Game
 he whole thing about CTC (CentralizedTraffic Control) is pretty cool. It allows a dispatcher hundreds of miles away to set signals and turnouts, getting far more utility out of track than earlier methods. However, finding a layout that uses it is very difficult (in Florida, I know one full CTC layout and another that only sets turnouts (signals don’t do anything at this time)). So if you wish to experience it, either you find one of those layouts or you play a simulator.
Which I”m including here:
https://randallhook.com/railroad-dispatcher/play/
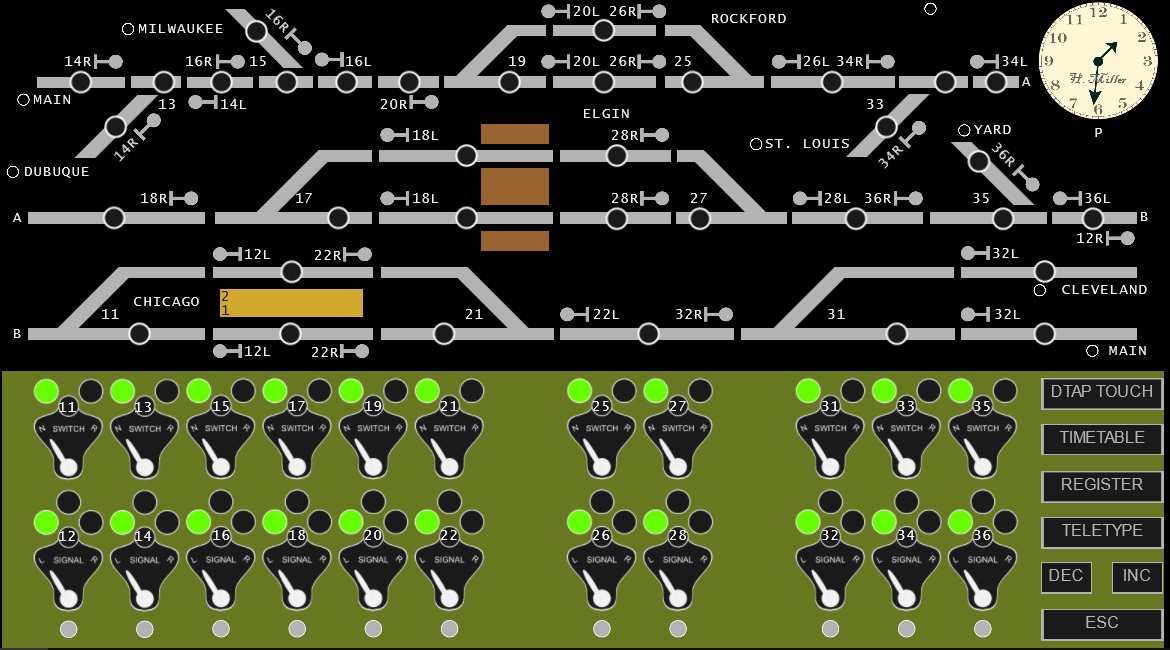
Now, keep in mind that this game was not quite completed – I’ll go over some shortcomings later. And it’s tricky to use. Let me show you what I do know and you can putz around with it. Here’s the board…

The route is divided into three rows, the top row to the west, the bottom row to the east. This is a bit problematic as, if it was only one row (as prototypical), all the associated levers would line up under their respective control points. Not so easy here – they are rather jumbled together.
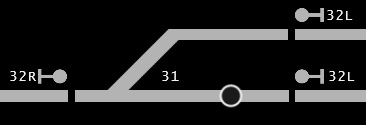
 This is a detailed look at a control point. This is turnout 31, guarded by three signals, a 32R and two 32Ls. There is no confirmation about which route and signals you’ve set – you’ll need to get good (damn good) at reading the lower panel. Note that in this simulation, the signals are always one ID number greater than the turnout (turnout is 31, signals are all 32s).

So to find the associated control toggles for this section, the key (I’ve found) is to look down to the toggle set somewhere roughly below the map area. Specifically, look at the turnout ID – that will be the turnout control so it’s not to tough to find them (you get better with time).
As you can see to the left, the switch control is always on the top, the signal on the bottom.
The Switch has two settings: N and R. N means the main line (straight) is the route through this turnout. R denotes the divergent route. In this example, the divergent route is set.
The Signal has three settings, L, R and center (off). If centered, the center light denotes red (protecting against all directions). If it is R, then 32R will be considered green (this is the case in the example). If L, then one of the two 32Ls will be green (which one is determined by the setting of the turnout itself). The memory trick here is that the train will proceed through the control point in the direction the toggle switch is thrown.
You can click on the Switch and Signal toggles to change them, but all you’ll see is the toggle arm move – the lights will stay the same. To actually change the lights, you’ll need to click the Command button (the gray button beneath both toggles). That is what updates the display AND makes the changes on the line.
Once you start the game, you might sit for a few seconds and then one of the approach lights will light up. You’ll see a yellow light illuminate near a location name. This means a train is standing by. Click on that light (if it is safe to do so) and in seconds that train appears on the nearby track, ready to proceed if the Switch and Signal positions at the next control point are correct. If the train doesn’t move, make sure the toggles are right and push the command button again. Once the train finds a correct signal, it will continue until it runs up against a Switch set against it or a signal set against it (either in the opposing direction or to center-up red. You cannot back trains up or make them stop except by setting the route against them.
As I said, this software appears to have been abandoned in development. There is no way to ID a train once it’s on the line (clicking on the light would have been a nice touch). Instead, you need to check the timetable which lists all the trains currently running on your division (hint – there can only be three maximum). Below shows three trains (all eastbound), all going to Cleveland. Generally they will be listed in order of appearance so the first train on the line will likely be the top one. I’ll also mention that to get eastbounds into Cleveland, you’ll need to set that final turnout and its signals as I’ve shown in the above examples. I’ll leave you to figure it out.

Further, you might get trains with an exit that does not show up on the board (i.e. possibly a Boston or New York). For a location not listed, you just send them down the straight/normal direction, to “Main”. That represents a location far away from our little division.
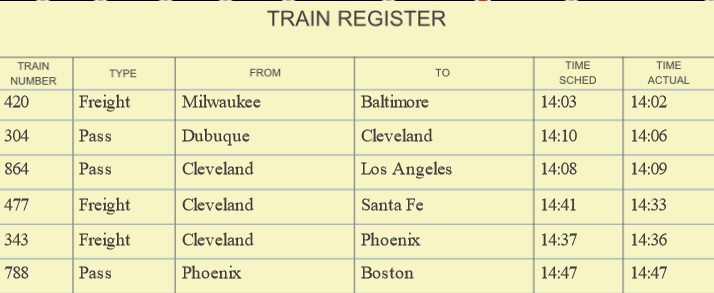
Okay, so how do you know how well you are doing. There is the REGISTER button, which shows the current list of trains that have completed. If you look at the example below, you can see when trains are scheduled to leave your division, and when they actually did. You get docked points when your train is late. Pick your meeting points to not delay trains too long.

As I mentioned earlier, it’s unfortunately an incomplete simulation. One of the killers is the incomplete signalling system. Really, trains in CTC should be protected by the signals around them. In some systems, the signals work as ABS (i.e., they go red when a train is in the next block). Or they will actually click off at the train passes (making you push the Command button again). As it stands now your trains are unprotected. This means if you have two trains running close in the same direction and you miss-set a control point, your train will quietly stop and the following train will dramatically crash into it, wiping out both. You will get a teletype notice (click on it) that tells you who killed who.
So the game is not perfect. There is no set ending point – you can play as long as you wish. But you have to be very methodical and get comfortable with the board (again, find the switch number in the control point and trace it below to the correct control). Really I’ve included this so you can have a shot and playing with a fun little simulator you can play for free.
So enjoy!
