On Sheet – MOW
On Sheet – MOW
 een watching a turnout slowly fail. It’s like watching a pet pass away.
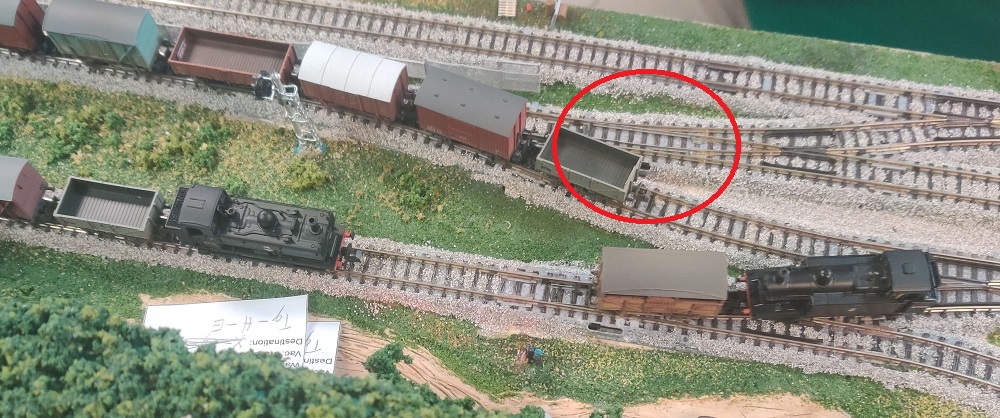
As you can see in the image below (taken during an “English” session) the circled turnout is the one that stopped throwing fully. We managed to carefully glue the drawbar pin down (it was loose) and that helped. For a bit. Then it wouldn’t throw fully, the points not firmed up on the rails. These Kato Unitrack #4s are prone to slipping their wire throws (had it happen once while running floor tests and I managed to open it up and fix it). But these are glued and ballasted down. In desperation, we cut a hole into the turnout just next to the drawbar so we could maybe shift it. And that helped, again for a bit.
But finally the bastard failed. Wouldn’t throw. Wouldn’t hold the points with any sort of tension. I just stood over the layout, realizing that this secured, embedded turnout was right in the middle of my tight switching district.
There was nothing for it for the immediate – yet I have a session scheduled next weekend. Time pressure. My cats wake me at 5am for feeding (they are very insistent) and normally I sleepwalk my duties and go back to bed. But for three mornings I’d lay in bed and think about how – if at all – I’d get that turnout out and replace it. Even had a spare standing by.
See, Kato Unitrack is like old snap track. Unlike traditional track on cork roadbed, where you can maybe unsolder the rail joiners and lift the turnout off, these had to be unconnected horizontally from the adjoining track (and as you can see above, there is no shortage of that). Also, you need to get some of the track lifted enough so you have the leeway to pull it apart. There was nothing like that in the immediate vicinity – just turnouts and tight fits. So I’d have to pry up track from the end of the layout and work inward.
Originally I planned to come in from the right side of the image. Maybe that would work. That idea held for a day (or rather, a morning). But then I decided that no, I needed to come in from the left. Not only is it half-unsceniced and less ballasted over that way, there is no grade crossing puttied in.
Like a cat burglar, my planning was meticulous. I bought the most narrow putty knife I could find for getting up the track and ballast. Then I flipped the layout and determined where every wire was – I didn’t want to shear them through when gouging the glue out. I looked it over from one end to the other and nodded – yes, this might actually work.
I was at the club on our Monday maintenance night (where the layout is stored). Standing at the layout, I took the cool putty knife handle in my hot, sweaty fist. Let’s get up a little track, just to see, just to understand. Yes, it took a bit of methodical, wire-careful prying but I got the double track power plant curve up. Okay, not bad. The next was the turnout that brought them past the distant signal. Very cautiously, I pried that up too. Now on a roll (and on the left side of the photo) I decided to keep going. The straight came up. First turnout, raised and pulled clear. And then the troublesome turnout – it hung in a bit but I finally popped it off.
I’ll admit that I had to open the turnout, then and there. I had to know. And yes, all our fumbling hole-probing in the dark confines of the switch had bent the wire – we’d never have seated it now. Setting it aside (I have a scrap yard to build and I’m going to put the turnout guts on the pile), I carefully cleaned up the rest of the glue and ballast spread.
I’d planned to come back the day after the Wednesday night meeting at the club. But after the meeting, I was looking over my demolished main track with my friend Ben and decided to test the turnout. Connected to the cables, fired up the interlocking that tested it. It threw perfectly. I figured that was enough for the night – I’m very timid at this sort of thing. But Ben and I were chatting and it reinforced my courage. Carefully we rebuilt the main. Really, it only took about a half-hour (talk abut me making a mountain out of a mole hill). In the end, it was all back in place. We put an engine on it and ran it about, testing the turnout, going in and out of the throw both ways, various directions. Perfect.
So, takeaways:
1) When you design and build your layout, ALWAYS have maintenance in the back of your mind. Do not bury turnouts in places you cannot reach.
2) Only use as much glue/track nails as absolutely needed to fix your track down. In retrospect, I used too much.
3) Carefully consider repairs before jumping in. Originally I thought my first plan to come in from the right (or “wrong”) side was good enough. Looking at it now, I realize that a lot more track would have had to come out. Thank goodness I came in from the other direction.
4) Consider all options. Can you repair rather than replace? Is there someone you can consult with about this before tools touch trouble?
5) Don’t let prior scheduling force you to rush the project. At the meeting (an hour before we actually, surprisingly replaced it), I told the membership that while we were having a Tuscarora session, it was not for certain. I left an out in case it failed.
6) Take your time. Go only as fast as you feel like.
7) Make it a project. Put planning, careful consideration and proper tools to work for you.
I’ve been in this hobby for sixty years and I’m still leaning things. That’s what it’s all about, I guess. I’m always learning new things.
And really, I’m relieved. If I can replace that turnout, there isn’t a one on the layout that isn’t beyond my ability to replace. Not that I’m zippidy-doo-dah on it or anything – I’ll still scream if another fails. But I know they are fixable. And that’s an important gain from his episode.
Keep ’em rolling!